2000元阿里云代金券免费领取,2核4G云服务器仅664元/3年,新老用户都有优惠,立即抢购>>>
阿里云采购季(云主机223元/3年)活动入口:请点击进入>>>,
阿里云学生服务器(9.5元/月)购买入口:请点击进入>>>,
前言
Locust is an easy-to-use, distributed, user load testing tool. It is intended for load-testing web sites (or other systems) and figuring out how many concurrent users a system can handle.
Locust是一个易于使用,分布式,用户负载测试工具。它用于负载测试web站点(或其他系统)并计算一个系统可以处理多少并发用户。
The idea is that during a test, a swarm of locusts will attack your website. The behavior of each locust (or test user if you will) is defined by you and the swarming process is monitored from a web UI in real-time. This will help you battle test and identify bottlenecks in your code before letting real users in.
在测试中,一群蝗虫会攻击你的网站。每个蝗虫(或者测试用户)的行为由您定义,集群过程由web UI实时监控。这将帮助您在让真正的用户进入之前进行测试并识别代码中的瓶颈。
Locust is completely event-based, and therefore it’s possible to support thousands of concurrent users on a single machine. In contrast to many other event-based apps it doesn’t use callbacks. Instead it uses light-weight processes, through gevent. Each locust swarming your site is actually running inside its own process (or greenlet, to be correct). This allows you to write very expressive scenarios in Python without complicating your code with callbacks.
Locust完全是基于事件的,因此在一台机器上支持数千个并发用户是可能的。与许多其他基于事件的应用程序不同,它不使用回调。相反,它通过gevent使用轻量级进程。每个聚集在你的站点上的蝗虫实际上是在它自己的进程中运行的(或者说是greenlet)。这允许您用Python编写非常有表现力的场景,而不用回调使代码复杂化。
帮助文档:https://docs.locust.io/en/stable/what-is-locust.html
快速安装
pip install locustio
主要命令
locust --help

Usage: locust [options] [LocustClass [LocustClass2 ... ]]

Options:
  -h, --help            show this help message and exit
  -H HOST, --host=HOST  Host to load test in the following format:
                        http://10.21.32.33
  --web-host=WEB_HOST   Host to bind the web interface to. Defaults to '' (all
                        interfaces)
  -P PORT, --port=PORT, --web-port=PORT
                        Port on which to run web host
  -f LOCUSTFILE, --locustfile=LOCUSTFILE
                        Python module file to import, e.g. '../other.py'.
                        Default: locustfile
  --csv=CSVFILEBASE, --csv-base-name=CSVFILEBASE
                        Store current request stats to files in CSV format.
  --master              Set locust to run in distributed mode with this
                        process as master
  --slave               Set locust to run in distributed mode with this
                        process as slave
  --master-host=MASTER_HOST
                        Host or IP address of locust master for distributed
                        load testing. Only used when running with --slave.
                        Defaults to 127.0.0.1.
  --master-port=MASTER_PORT
                        The port to connect to that is used by the locust
                        master for distributed load testing. Only used when
                        running with --slave. Defaults to 5557. Note that
                        slaves will also connect to the master node on this
                        port + 1.
  --master-bind-host=MASTER_BIND_HOST
                        Interfaces (hostname, ip) that locust master should
                        bind to. Only used when running with --master.
                        Defaults to * (all available interfaces).
  --master-bind-port=MASTER_BIND_PORT
                        Port that locust master should bind to. Only used when
                        running with --master. Defaults to 5557. Note that
                        Locust will also use this port + 1, so by default the
                        master node will bind to 5557 and 5558.
  --expect-slaves=EXPECT_SLAVES
                        How many slaves master should expect to connect before
                        starting the test (only when --no-web used).
  --no-web              Disable the web interface, and instead start running
                        the test immediately. Requires -c and -r to be
                        specified.
  -c NUM_CLIENTS, --clients=NUM_CLIENTS
                        Number of concurrent Locust users. Only used together
                        with --no-web
  -r HATCH_RATE, --hatch-rate=HATCH_RATE
                        The rate per second in which clients are spawned. Only
                        used together with --no-web
  -t RUN_TIME, --run-time=RUN_TIME
                        Stop after the specified amount of time, e.g. (300s,
                        20m, 3h, 1h30m, etc.). Only used together with --no-
                        web
  -L LOGLEVEL, --loglevel=LOGLEVEL
                        Choose between DEBUG/INFO/WARNING/ERROR/CRITICAL.
                        Default is INFO.
  --logfile=LOGFILE     Path to log file. If not set, log will go to
                        stdout/stderr
  --print-stats         Print stats in the console
  --only-summary        Only print the summary stats
  --no-reset-stats      [DEPRECATED] Do not reset statistics once hatching has
                        been completed. This is now the default behavior. See
                        --reset-stats to disable
  --reset-stats         Reset statistics once hatching has been completed.
                        Should be set on both master and slaves when running
                        in distributed mode
  -l, --list            Show list of possible locust classes and exit
  --show-task-ratio     print table of the locust classes' task execution
                        ratio
  --show-task-ratio-json
                        print json data of the locust classes' task execution
                        ratio
  -V, --version         show program's version number and exit
快速上手
第一步,编写一盒简单的脚本。
# -*- coding: utf-8 -*-
# @Time    : 2019/12/31 20:24
# @Author  : 7DGroup
# @File    : SevenLoust.py
# coding:utf-8

from locust import HttpLocust, TaskSet, task

# HttpLocust 这个类的作用是用来发送http请求的
# TaskSet   这个类是定义用户行为的,相当于loadrunnerhttp协议的脚本,jmeter里面的http请求一样,要去干嘛的
# task   这个task是一个装饰器,它用来把一个函数,装饰成一个任务,也可以指定他们的先后执行顺序

class SevenLoust(TaskSet):
    # 自己定义的类,继承TaskSet,也就是这个类是实现咱们要去请求什么的
    '''打开7DGroup'''

    @task(1)  # @task#用task装饰器把这个函数装饰成一个咱们要执行的性能任务
    def open_7dtest(self):  # 这个函数里面定义的是咱们要具体做的操作
        # 定义requests的请求头
        header = {


            "User-Agent": "Mozilla/5.0 (Windows NT 10.0; Win64; x64) AppleWebKit/537.36 (KHTML, like Gecko) Chrome/79.0.3945.88 Safari/537.36"}

        r = self.client.get("/", headers=header, verify=False)  # 请求这个url里面的哪个路径,
        print(r.status_code)
        assert r.status_code == 200


class websitUser(HttpLocust):
    # 这个类继承了HttpLocust,代表每个并发里面的每个用户
    task_set = SevenLoust  # 这个是每个用户都去干什么,指定了 SevenLoust 这个类,
    min_wait = 3000  # 单位毫秒
    max_wait = 6000  # 单位毫秒


if __name__ == "__main__":
    import os

    # -f是指定一个python文件 后面跟上咱们刚才写的python文件
    # --host是你要访问哪个网站,后面跟网站的url
    os.system("locust -f sevenLoust.py --host=http://www.7dtest.com/7DGroup/")
点击启动
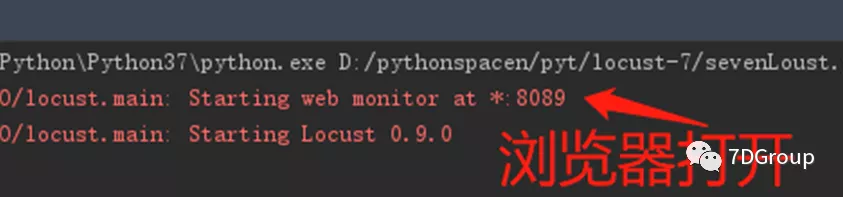
打开浏览器显示: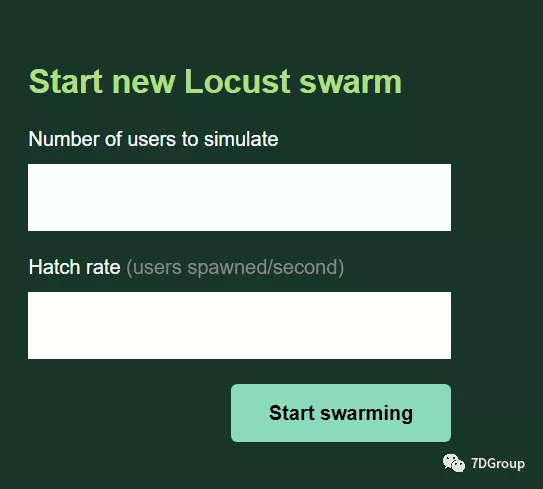
参数说明:
- Number of users to simulate 设置虚拟用户总数
- Hatch rate (users spawned/second) 每秒启动虚拟用户数
第二步,点击 Start swarming开始运行性能测试。
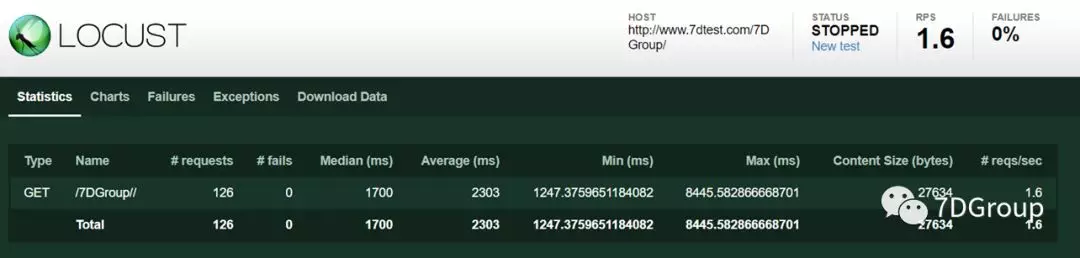
主要参数说明:
- Type:请求类型;
- Name:请求路径;
- requests:当前请求的数量;
- fails:当前请求失败的数量;
- Median:中间值,单位毫秒,一般服务器响应时间低于该值,而另一半高于该值;
- Average:所有请求的平均响应时间,毫秒;
- Min:请求的最小的服务器响应时间,毫秒;
- Max:请求的最大服务器响应时间,毫秒;
- Content Size:单个请求的大小,单位字节;
- reqs/sec:每秒钟请求的个数。
第三步,查看报告显示。
吞吐量/每秒响应事务数(rps)实时统计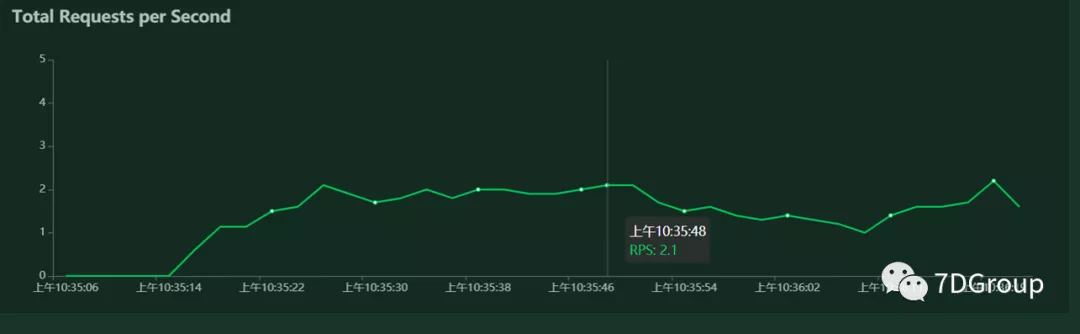
平均响应时间/平均事务数实时统计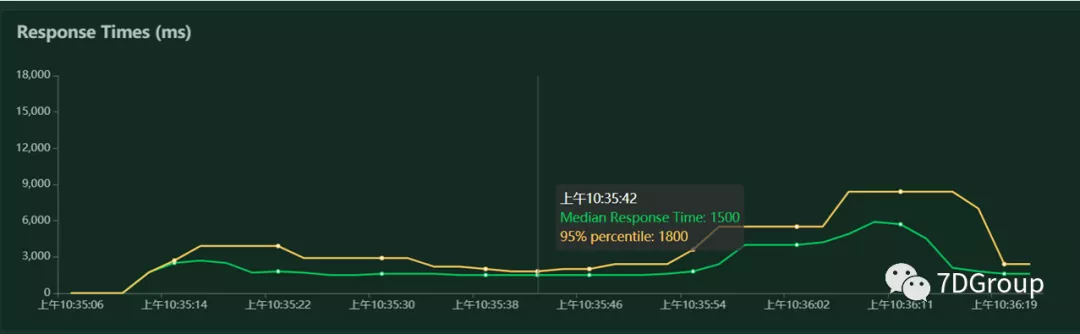
虚拟用户数运行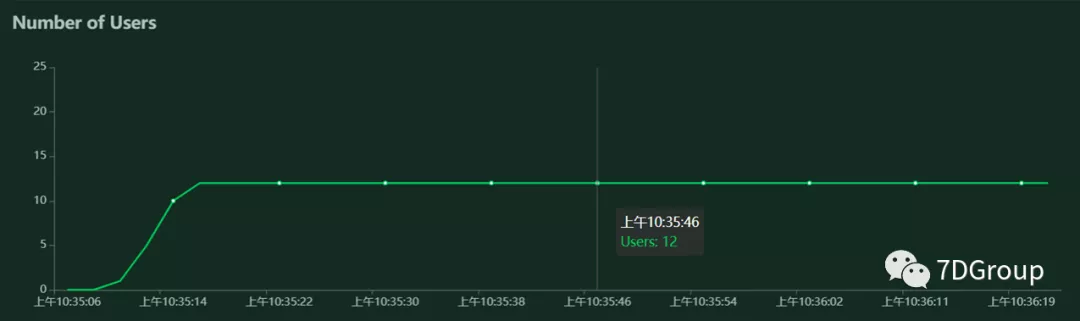
第四步,停止点击按钮结束测试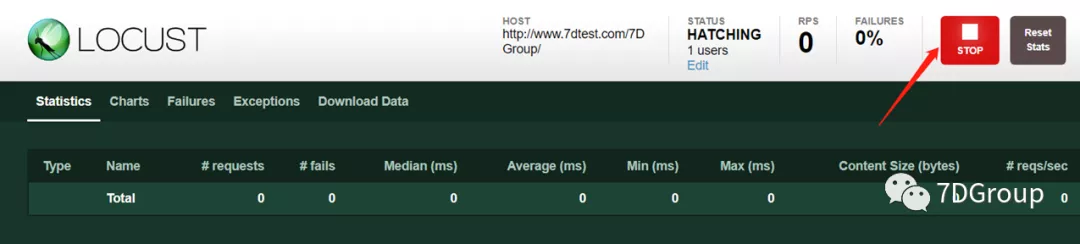
总结
以上是简单上手示例,只要会点 Python 基础,就可以快速入门。